Showing posts with label Recipes and Food. Show all posts

Wednesday, October 31, 2012

How to Store Fresh Veggies and Fruits


I saw this on a blog and had to share it with my readers.  So many times we just don't know how to store fresh fruits and veggies...this will help you get it right.

There are a few things to consider: what needs to be in the refrigerator, and what needs a cool place and what can't be by other foods and stored by itself.  If you can make a few minor corrections in how you store your food, you will find it will keep longer and you will save money as you enjoy fresher produce.


ROOM TEMPERATURE or COOL PANTRY:
Avocados       Apricots          Bananas          Citrus
Garlic              Kiwi               Melons            Nectarines
Onions            Pears               Peaches           Plums
Pineapple        Potatoes

REFRIGERATE:
Apples            Beans              Berries            Broccoli
Cabbage         Carrots             Cauliflower    Celery
Cherries          Corn                Cucumber      Eggplant
Ginger            Grapes             Jalapenos       Leafy greens
Mushrooms    Zucchini


It kind of comes down to which fruits and vegetables give off the natural gas, ethelyne.  Ethelyne can affect the other fruits and veggies that they are stored next to.  
You don't need to buy special bags, but you do need to know which produce doesn't take too kindly to others.

Apples - Do not wash until just before eating, keep them sealed in the plastic produce bag, in the refrigerator. They give off a lot of ethelyne gas, so don't store them next to anything else.Avocados - Keep them at room temperature.  If you need one to ripen quickly, put it in a brown paper bag along with a banana.  If it is ripe and you need to slow the ripening process, put it in the fridge.
Bananas - They produce more ethelyne gas than any other fruit.  Keep them away from other produce,   on the counter-top, away from other produce.  Once they are ripe you can stop the ripening process by putting them in the fridge, just be sure to put them in a sealed bag.  The skin will turn black, but the fruit will be fine.Beans (snap, string or wax) - Store in a plastic bag in the refrigerator.  Do not wash until just before use.Berries - You know when you buy berries and they look like they have a dusty layer one them...? That is called bloom, and it serves as a natural preservative.  Never wash berries until just before use.  Pick through them and throw away any berries that are bruised or molding.  Store loosely in shallow containers, cover with plastic and keep them in the refrigerator.Broccoli & Cauliflower - These need to be kept in their wrapping/packaging and kept in the fridge.  Do not wash until just before using.
Cabbage - Keep in the fridge, in a plastic bag. Do not wash until just before usingCarrots - Whole carrots?  Wash them thoroughly.  If they have green tops, cut off all but an inch.  Wrap them in a damp paper towel, seal in a plastic bag and store in the crisper drawer.  "Baby" carrots?  You can put them in a plastic container, covered in water.  Be sure to change the water every few days.  (Note: this may reduce the flavor of the "baby" carrot.)Celery - Give it a rinse, loosely wrap it in a paper towel, then tightly wrap the entire stalk in aluminum foil and keep in the crisper.  It will keep fresh and crisp for weeks.  (I actually have had celery that I bought to make stuffing at Thanksgiving still be fresh and crunchy for Bloody Marys on New Year's Day! Amazing!)
Cherries - Store in fridge in plastic bag.  Do not wash until just before eating.Citrus - Since citrus fruits have thicker skin, they are easier to store.  They'll stay fresh for about 2 weeks in the fridge, about a week on the counter.  It doesn't matter if they are near other produce.
Corn - Husks on? Store loose and uncovered in the fridge.  Husks off?  Wrap in foil and store in the crisper drawer. It will keep for 1 to 2 days.Cucumber - Store in plastic bag in the refrigerator. Do not wash until just before use.Eggplant - Wrap in plastic and refrigerate.Garlic - Store at room temperature. Whole heads will last 3 to 5 weeks, but once cloves are separated, they will last about 10 days. Grapes - Do not wash until just before eating, as they also have a bloom.  Store them in the fridge, in the plastic bags they come in, or poke holes in a plastic bag to allow for air circulation.  They say they should last up to 2 weeks.  (I have never seen them last longer than a week before getting shriveled up and gross...)Jalapeno Peppers - Store in plastic bag, in the crisper drawer of the refrigerator.Kiwi Fruit - store at room temperature until ripe, then cover with plastic and refrigerate.  Will keep for about a week.Lettuces, Leafy Greens & Spinach - Wash, wrap loosely in paper-towels, then bag it... paper towel and all.Melons - Store at room temperature until ripe, then refrigerate. They will keep for about a week.Mushrooms - Do not wash until just before using.  Pre-sliced? Store in the refrigerator in their original packaging. They will last for about a week. Whole?  Store loosely in a brown paper bag in the refrigeratorOnions - Store in a cool, dry place that has good air circulation.  (Store in the fridge if you don't have such a place.) They will keep for 2 to 3 months.  DO NOT STORE WITH POTATOES.  (If next to each other they spoil faster.  Who knew?)Pears - If they aren't ripe, store them at room temperature.  Once they ripen, place them in a plastic bag and store them in the fridge.  They will keep for about a week.Peaches, Plums, Nectarines & Apricots - Store at room temperature until ripe, then store in plastic bags in the refrigerator until ready to eat.  They will keep from 3 to 5 days.  Do not wash until ready to eat. Pineapple - Store at room temperature until ripe, then store in the refrigerator for up to 5 days.Potatoes - Store in a cool, dry, dark place that has good air circulation. They will keep for 2 to 3 months.  DO NOT STORE WITH ONIONS.  (If next to each other they spoil faster.  Who knew?)  Sweet Potatoes keep at room temperature for a week or in a cool dark place for about a month.
Tomatoes - Store them in a cool, dry place.  Don't store them in plastic bags as the trapped ethylene will make them ripen more quickly. Once ripe, you can put them in the fridge to slow the ripening process, but let them come to room temperature before using them. Zucchini - Refrigerate in a plastic bag.  Do not wash until just before using.

Freezing Berries:
Rinse them.
Dry them.
Place them on a cookie sheet and freeze for about 15 minutes
When the outsides of the berries are frozen, put them in a zippy bag and freeze for later.

I did that with the blueberries a while back and I'm just now down to about 1 container worth and they are just as yummy now as they were when we got them.  ENJOY!

Friday, March 30, 2012

Faith Cakes

So a friend made one of these Faith Cakes and I thought hers was pretty impressive so I had to get details on how to make a Faith Cake.  So in my research, I found the following steps to build one.  I thought it was pretty impressive and wanted to share it with you as well!  ENJOY!

FAITH CAKE:


To make this cake you will need:
2 boxes White Cake

1 box Devils Food Cake

Basically, I am not posting here a recipe but more an order on HOW TO create this fabulous cake!  What a great treat to have as we celebrate the RESURRECTION in about a week! 


First you cook the cakes (2 chocolate, 4 vanilla).  Freeze one hour.

Trim the cakes to make them smooth.

Crumble ONE Chocolate Cake and the remains of the SECOND Chocolate Cake.  Add 1/2 frosting to crumbs.  Mix.

Circle cut from ONE cake...use tupperware bowl or something smaller than cake pan.

Cut the same circle used above and cut ONE of the vanilla cakes.

Start with WHOLE Vanilla Cake on plate and then frost.  Add Second layer, frost.  THIRD layer with hole,.

This is what you should have so far.  Frost this layer missing the hole.

Insert cut CHOCOLATE circle into hole.

This is what your cake should look like.

Using a LONG vase or narrow drinking glass, cut through your cake... to the plate and remove cake from center.

Cut the SAME size hole in the last White Layer and place on top, lining up center hole.

This is what your cake should look like from the top.

Remember our crumbs mixed with frosting?  We will now begin STUFFING the whole with that mix.

This is what your STUFFED center hole and cake should look like.

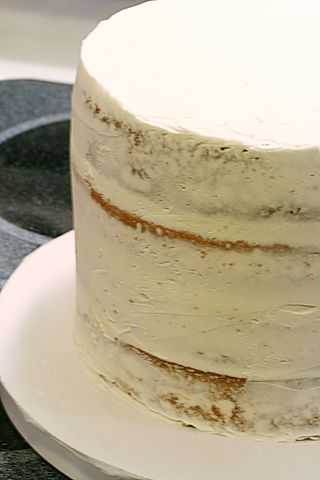
Now "crumb coat" your cake.  (A thin layer of icing,  put aside in fridge to set.

Frost your set cake.

Decorate with some creativity!

Here are some intricate designs up close.

This was such a beautiful display.

Here you can see the detail and time needed to create this masterpiece!

And FINALLY our finished cake, cut and displaying a wonderful cross hidden inside for all to see!  ENJOY!

Tuesday, December 6, 2011

Faith Cakes

So a friend made one of these and I thought hers was pretty impressive so I had to get details on how to make a Faith Cake.  So in finding it, I wanted to share it with you as well!  ENJOY!

FAITH CAKE:

To make this cake you will need:
2 boxes White Cake
1 box Devils Food Cake
and ingredients (below) for frosting.
4 round cake pans (8" or 9")
Rectangle cake pan

For Buttercream Frosting:
(If you like more frosting between layers make MORE frosting)
1 cup veg. shortening (Crisco type - do NOT use butter flavor.)
1 cup room temperature butter
2 teaspoons clear vanilla extract
1 teaspoon almond extract
8 cups sifted (sifting is a must!) confectioners sugar (powder sugar)
1/4 cup + 1 tablespoon milk

For Frosting Mix: 
White Cakes
Cream together shortening and butter until light and fluffy. And extracts, mix until combined. Add sugar, one or two cups at a time, until fully blended. The frosting should look dry. You can now add the milk to get a smoother, glossier, and easier to spread consistency. (if you need to add some milk AFTER the 4 cups of sugar you can).
Leveled White Cakes


For the WHITE Cake Mix: 
You will be using an 8in or 9in round cake pan (whichever you like) for the white cake. You will need to make four layers. I suggest you freeze the layers for at least an hour before assembling the cake. You can also freeze them overnight to save time if you like!


After cooling, level the white cakes.

Devils Food Round

For the DEVILS FOOD Cake Mix:
Devils Food Crumbled
After you have baked the devils food cake in the rectangle pan per the boxes instructions, cool it.  (Again, use the freezer for an hour or so). You will then need to use a round cutter (like a tupperware bowl or large cool whip container) and cut a circle from the rectangle cake.
Once completed, use all the leftover devils food cake and begin to  crumble it.

You may need to add some frosting to make it stick together.  (For one box of devils food cake add approximately 1/2 cup frosting. Blend with a fork or your hand to mix together.)


Three Layers From Side
Now, using the same cutter (the tupperware bowl or cool whip container that you used above to cut the devils food cake), cut the same shape out of the white cake.   That devils food is going to fit perfectly into the white cake then on layer number 3.


Now, to get started with assembly. Put one layer of your white cake on your plate. Add about 1/2 cup frosting and add another layer (this could be number 2). Add another 1/2 cup frosting and add your third layer (the one with the cutout).
                                      
                                                 Third Layer Without Insert
Three Layers
Chocolate Center Added
It should look like this above before you put the chocolate round piece (left)  in the spot cut out.  After you add the chocolate insert into the 3rd layer it should look like this image on the right.


NOTE:  Now you will have to find a round cutter that can cut the center out of your cakes stacks.  If you have a vase that is shorter, you will have to cut through the three layers now as your cake will get too tall with four layers to cut through.  If you have a taller vase, you can add the fourth layer and then cut the center out using the vase.

Three Layers with Center Hole

So with your decision made you also need to start frosting the sides too and then keep stacking up layers by adding the 1/2 cup frosting and then adding your fourth layer.


Four Layers Cut Out
With the fourth layer in place and your center cut out with a tall vase, we need now to begin the process of filling the center hole.


Again, you cave to have this longer vase about 50% smaller in diameter than the tupperware bowl or cool whip container you used on layer three and you have to have already cut the center out of ALL the four layers.  Go through all layers of the cake and get a fork or spoon and carefully scoop out the excess cake.

Cut Fourth Layer Cut Out

If you only add three layers and then add your fourth layer, you will need to guesstimate where the hole would go or you could try to cut is out before you stack it up.
Devils Food Crumbled


Now remember that devils food cake that we crumbled and added some frosting too to make it more pliable?  Well, now we are about to use it.


With the entire devils food cake crumbled, we are going to fill up the entire hole with the cake mixture.


Four Layers with Filling
Just  start stuffing cake mixture into the center hole until the hole is full.  (Again, this works MUCH better if your white cake is frozen or very chilled).   Click here for a tutorial on how to "crumb coat" a cake.
Crumb Coated Cake


After adding the crumb coat layer, put the cake in the freezer overnight.  The next morning, add another layer of frosting. Be generous with your frosting now because this is a big cake and it can handle the frosting.  That is why I use more frosting than called for above between the layers.


Frosted Cake
Now you are ready to decorate the cake.  I found these photos below.  You can practice with a piping bag and a decorating tip using a piece of paper.  Practice will help your technique.

Top View
Side View

     
Top View of Cake


Close Up of Decorating
And this is what you see after you cut into your cake.  A cross.  Hence the name, 'Faith Cake'. ENJOY!
Faith Cut Inside View

Wednesday, October 12, 2011

God's Pharmacy


God's Pharmacy
Stumbled across this and thought it was worth sharing!  In Genesis, God first separated the salt water from the fresh, made dry land, planted a garden, made animals and fish...all before making a human. He made and provided what we'd need before man was even created.
These fruits and vegetables are best and more powerful when eaten raw. 

We're such slow learners...God left us a great clue as to what foods help what part of our body!


                A sliced Carrot loo
ks like the human eye. The pupil, iris and radiating lines look just like the human eye.. And YES, science now shows carrots greatly enhance blood flow to and function of the eyes.


A Tomato has four chambers and is red. The heart has four chambers and is red. All of the research shows tomatoes are loaded with lycopine and are indeed pure heart and blood food.


Grapes hang in a cluster that has the shape of the heart. Each grape looks like a blood cell and all of the research today shows grapes are also profound heart and blood vitalizing food.


A Walnut looks like a little brain, a left and right hemisphere, upper cerebrums and lower cerebellums. Even the wrinkles or folds on the nut are just like the neo-cortex. We now know walnuts help develop more than three (3) dozen neuron-transmitters for brain function


Kidney Beans actually heal and help maintain kidney function and yes, they look exactly like the human kidneys.


Celery, Bok Choy, Rhubarb and many more look just like bones. These foods specifically target bone strength. Bones are 23% sodium and these foods are 23% sodium. If you don't have enough sodium in your diet, the body pulls it from the bones, thus making them weak. These foods replenish the skeletal needs of the body.


Avocados, Eggplant and Pears target the health and function of the womb and cervix of the female - they look just like these organs. Today's research shows that when a woman eats one avocado a week, it balances hormones, sheds unwanted birth weight, and prevents cervical cancers. And how profound is this? It takes exactly nine (9) months to grow an avocado from blossom to ripened fruit. There are over 14,000 photolytic chemical constituents of nutrition in each one of these foods (modern science has only studied and named about 141 of them).


Figs are full of seeds and hang in twos when they grow. Figs increase the mobility of male sperm and increase the numbers of Sperm as well to overcome male sterility.


Sweet Potatoes look like the pancreas and actually balance the glycemic index of diabetics.


Olives assist the health and function of the ovaries.


Oranges, Grapefruits, and other Citrus fruits look just like the mammary glands of the female and actually assist the health of the breasts and the movement of lymph in and out of the breasts.


Onions look like the body's cells. Today's research shows onions help clear waste materials from all of the body cells. They even produce tears which wash the epithelial layers of the eyes. A working companion, Garlic, also helps eliminate waste materials and dangerous free radicals from the body.